Print Comments In A Word For Mac Document
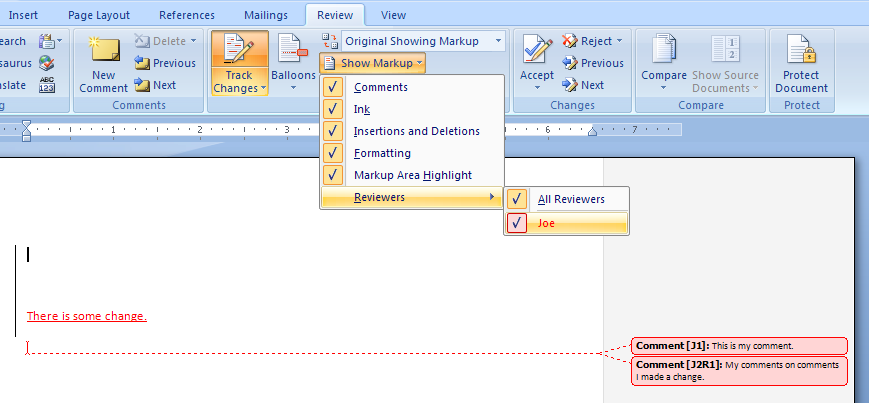
Add a comment to your Word 2016 document, and the markup area appears on the right side of the page. The markup area appears whenever a document features comments, but its appearance is controlled by settings on the Review tab. To hide the markup area, click the Review tab. In the Tracking group, click the Display for Review button, shown here.
Preview and print your document • On the File menu, click Print. • To preview each page, click the arrows at the bottom of the preview. If you don't see the preview, below Presets, select Copies & Pages and check the box next to Show Quick Preview. • Choose the number of copies, and any other options you want, and click the Print button.
Print specific pages • On the File menu, click Print. • To print only certain pages, under Pages, do one of the following: • To print the page shown in the Quick Preview, select Current Page. • To print consecutive pages like 1 -3, select From and enter the first and last page numbers in the From and To boxes. • To print individual pages and a range of pages (like page 3, and pages 4-6) at the same time, select Page Range, and enter the page numbers and ranges separated by commas (e.g.
Print on both sides of the paper The easiest way to produce double-sided publications is to print them on a printer that supports duplex printing. To find out whether your printer supports duplex (also referred to as double-sided or two-sided) printing, you can check your printer manual or consult your printer manufacturer, or you can do the following: • On the File menu, click Print. • Click Copies & Pages, and then click Layout. • Click Two-Sided, and then select Long-Edge binding (to flip pages on the long end) or Short-Edge binding (to flip pages on the short end). If your printer doesn't offer automatic duplex printing, you can follow these steps to manually print on both sides of the paper.
• On the File menu, click Print. • Click Copies & Pages, and then click Microsoft Word. • Click Odd pages only. • After the odd pages are printed, flip the stack of pages over, reinsert the stack into the printer, repeat steps 1 and 2, and then click Even pages only.
Depending on the printer model, you might have to rotate and reorder the pages to print the other side of the stack. Print only odd or even pages • On the File menu, click Print. • Click Copies & Pages, and then click Microsoft Word.
• Click Odd pages only or Even pages only. Print in reverse order If your printer stacks the output back-to-front, you can still have your pages print in the correct order. Follow these steps to print a document that begins with the last page. • On the Word menu, click Preferences. • Under Output and Sharing, click Print. • Under Print options, select the Reverse print order check box. Change the page orientation for a document • On the Layout tab, click Orientation, and then click Portrait or Landscape.

• On the File menu, click Print. Change the orientation for specific pages • Select all the text on the pages you want to change. Tip: To change the orientation for all pages after the cursor, instead of selecting text, click where you want to start the new page orientation. On the Format menu, click Document, click Page Setup, select the orientation you want, and then click OK.
Next to Apply to, click This point forward. • On the Format menu, click Document. • Click Page Setup at the bottom of the dialog box. • Next to Orientation, click the orientation you want, and then click OK. • Next to Apply to, click Selected text, and then click OK. • On the File menu, click Print.
Change the orientation for a specific section. Important: To change the orientation for a specific section, your document must be divided by section breaks. Learn how to. • To display nonprinting characters, such as paragraph markers (¶), click Show all nonprinting characters on the Home tab. • Double-click the section break that follows the section you want to change.
And for these reasons, 'Intego’s Mac Internet Security X9 is our pick of the bunch, making it the best antivirus for Mac 2018.' Intego is incredibly proud that our Mac Internet security software has been recognized as the best anti-virus solution in its class. The Mac Security Blog. Tag Archives. Review Intego + Recommended + Software & Apps. Macworld has published a thorough review of Mac Internet Security X8, Intego's latest anti-virus and Internet security software for. By Derek Erwin. Intego + Recommended. Antivirus for mac. Our review of Intego Mac Internet Security X9 is a tale of two halves. Intego matched all of its Best Mac Antivirus rivals in terms of malware detection and protection. However, its impact on the system load lets itself down badly. Intego Mac Internet Security X9 review: No fatal flaws, but it lacks necessary modern features While it can detect viruses, it lacks the features modern anti-malware software requires. This Mac antivirus scanner took longer to install than other applications on our comparison. We had to initiate the Intego Mac Security X9 download process three times before it was successfully installed, but once it was, it immediately began scanning for threats on our test Mac.
After having a look at repository location next double click on same “Demorepository” from Team Explorer, it will display a new window with 4 options. • Changes • Branches • Pull Requests • Sync • Settings Now just click on changes view it will show entire application to commit. Project Structure After creating a project now if you visit the cloned location which you have specified you will see a “.git” folder and a solution folder. 
Section breaks look like this: • Click Page Setup. • Next to Orientation, click the orientation you want, and then click OK. • Next to Apply to, click This section, and then click OK. • On the File menu, click Print. Tip: If you don't see other print options in the Print dialog box, click the blue downward facing arrow to the right of the Printer pop-up menu. Print specific pages or sections • On the File menu, click Print. • On the Printer pop-up menu, select the printer that you want.